

Users and roles
This is where you decide who works with aYOUne and what that person may do. The two hang
together: an account on its own sees nothing — only the role decides which areas open up.
The idea in three sentences
A role is a ready-made bundle of permissions that you put together once and hand out as
often as you like. A user is an account to which you assign exactly one role. If you change
the role later, access changes immediately for everyone who holds it — you never have to touch
an individual account.
That is why it pays to build the roles first and create the people afterwards.
Creating a role
Administration → Roles → Create
The overview shows every existing role with four pieces of information:
| Column | Meaning |
|---|---|
| Name | What the role is called, for example Sales or Service |
| Description | What it is meant for — fill this in, your future self will thank you |
| Default | If ticked, it is suggested for new accounts |
| Permissions | How many permissions the role covers |
When creating a role you give it a name and pick which areas it should open. The areas are
grouped by topic, so you do not have to scroll through an endless list.
A practical piece of advice: create few well-considered roles rather than many special
cases. Five to ten roles are enough for the vast majority of companies. If you need a variant,
duplicate an existing role and adjust it instead of starting from scratch.
When an area cannot be granted
Some areas cannot be selected even though you can see them in the list. In that case the area is
not part of the scope you have booked. This is not a misconfiguration you could fix yourself —
talk to your contact about an extension.
The other way round: a role can never open more than your scope allows. So there is nothing you
can break by configuring it.
Creating a user
Administration → Users → Create
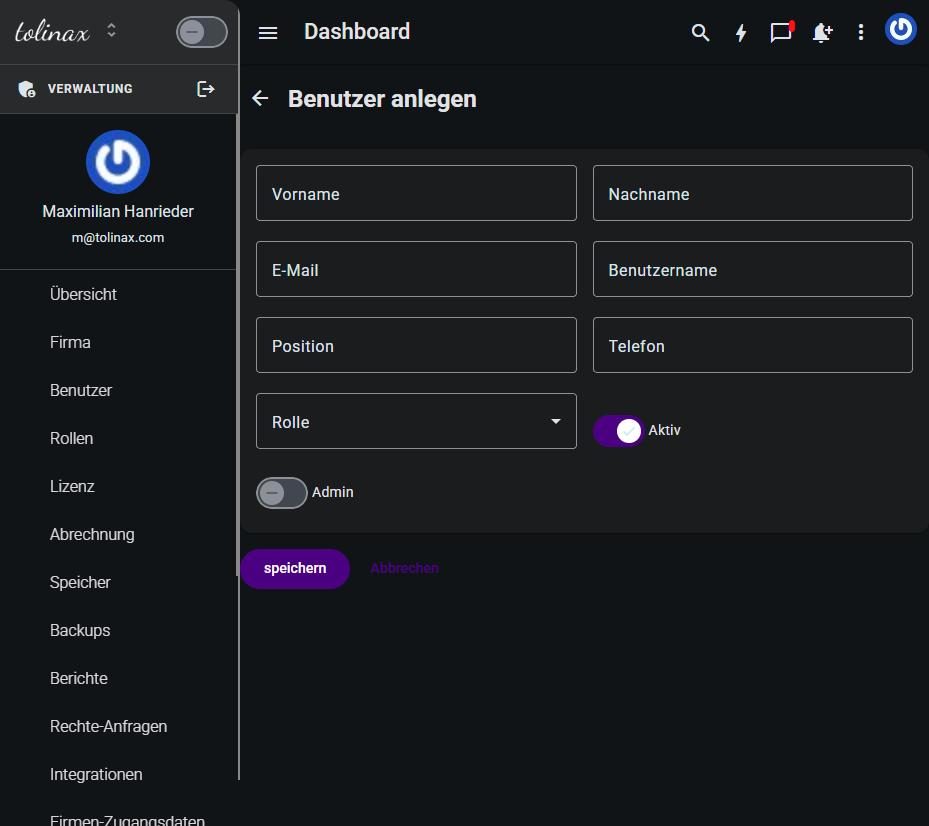
The form asks for:
| Field | Note |
|---|---|
| First name, Last name | How the person appears in lists and assignments |
| Also the sign-in — it has to be right, the invitation goes there | |
| Username | A short form, for signing in and for mentions |
| Position | Free text, for example Head of Sales |
| Phone | Optional |
| Role | The choice from the previous section |
| Active | On by default — only an active account can sign in |
| Admin | Off by default. See below |
Then save. The person receives an email and sets their own password.
Next to Create there is Invite team member. The difference: when creating, you fill in the
master data yourself; when inviting, the invited person adds it on first sign-in. For a single
new colleague, inviting is the shorter route.
The admin switch
The Admin switch lifts an account beyond its role and gives it access to the administration
itself — that is, to exactly the chapters of this handbook. Hand it out sparingly and only to
people who really are meant to maintain accounts and roles.
Rule of thumb: in a company of thirty people, two or three need this switch, not ten.
Leavers: deactivate rather than delete
When someone leaves the company, switch Active off instead of deleting the account. Signing
in is blocked immediately, but everything that person created — records, notes, assignments —
stays readable and correctly attributed.
Delete the account instead and you lose that attribution. Deleting is meant for test accounts,
not for former colleagues.
What the overview shows you
The user list tells you at a glance whether an account is active, since when it has existed and
when the person last signed in. The Last login column is the fastest way to find orphaned
accounts: anyone who has not signed in for months probably no longer needs access.